From Simple Resets to Backlight and OLED Panel Diagnostics – Your Complete Fix-It Manual
The Google Nest Thermostat is a marvel of smart home technology, designed to learn your habits, optimize your energy usage, and keep your home perfectly comfortable. But what happens when the “smart” thermostat starts acting dumb? You feel chilly, but the Nest proudly displays a balmy 75°F. Or you’re sweating, but it insists the room is a cool 68°F. An inaccurate thermostat is failing at its most fundamental job, leading to discomfort, wasted energy, and immense frustration.
If your Nest thermostat is reading the wrong temperature, don’t panic. The cause is rarely a catastrophic hardware failure. More often than not, the issue stems from a simple misunderstanding of the display, an environmental factor, or a software setting that can be easily corrected.
This definitive guide will serve as your calm, expert technician. We will provide a logical, step-by-step troubleshooting process, starting with the most common and user-correctable issues and moving methodically toward more advanced diagnostics. Our goal is to empower you to diagnose and fix the root cause of the inaccurate reading yourself, saving you time and a potentially unnecessary repair bill.
The First Step: Understanding What You’re Seeing on the Display
Before you assume your thermostat is broken, it’s crucial to make sure you are reading the display correctly. This is, by far, the most common point of confusion for new Nest users.
Current Temperature vs. Target Temperature: The #1 Misunderstanding
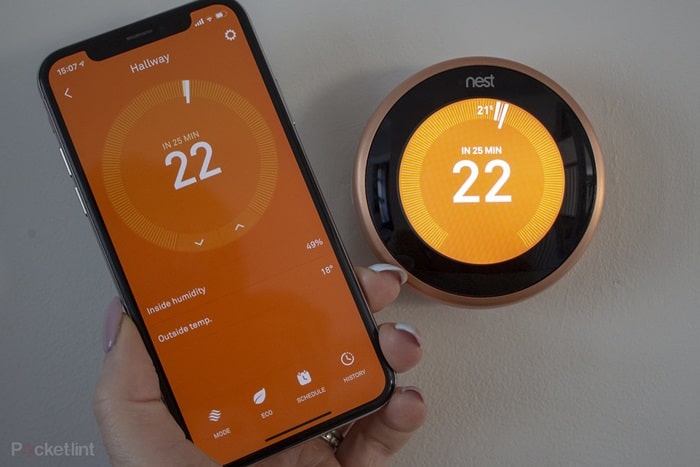
The Nest Thermostat’s beautiful, minimalist display shows two primary temperatures, and it’s vital to know which is which.
- The Target Temperature: This is the large, prominent number displayed in the center of the screen. This is the temperature you want the room to be. This is the number that turns orange for heating or blue for cooling.
- The Current Temperature: This is the actual, ambient temperature that the thermostat’s sensors are currently reading in the room. This is displayed as a smaller number along the edge of the circular display.
If you feel cold and the large number in the center says 75°, it doesn’t mean the thermostat is reading the room as 75°; it means someone has set the target temperature to 75°. Always check the small number on the edge for the real-time room temperature.
Temperature Rounding Explained
To provide a cleaner user interface, the main temperature displayed on the thermostat and in the Google Home app is rounded to the nearest whole degree in Fahrenheit or half-degree in Celsius. However, the thermostat’s internal sensors are much more precise. This can lead to situations where the app might show 70°F, but the system doesn’t turn on until the actual unrounded temperature drifts further. You can see the precise, unrounded temperature by navigating to Settings > Technical Info on your thermostat.
Tier 1 Troubleshooting: Environmental Sabotage – Is Your Nest’s Location the Problem?
If you’ve confirmed you’re reading the display correctly, the next and most likely culprit is the thermostat’s physical location. A thermostat can only read the temperature of the air immediately surrounding it. If that location is compromised, all of its readings will be skewed.
The Golden Rule of Thermostat Placement
For an accurate reading, a thermostat must be mounted:
- On an interior wall.
- In a central location with good, natural airflow (like a main hallway or living room).
- Approximately 5 feet (1.5 meters) from the floor.
The 4 “Phantom Heat” and “Phantom Cold” Culprits
If your Nest is reading consistently higher or lower than the rest of the room, it’s almost certainly being affected by one of these environmental factors:
- Direct Sunlight: This is the most common cause of artificially high temperature readings. If a sunbeam hits your Nest thermostat for even 30 minutes a day, it will heat up the device and cause it to think the room is much warmer than it is, prematurely shutting off your air conditioner.
- Drafts: Is your thermostat located near a drafty door or window? Is it directly next to or above a large air return vent? A constant draft of cold or warm air will trick the sensor and cause your HVAC system to run unnecessarily.
- Heat Sources: Do not place your thermostat near heat-generating devices. This includes lamps (especially those with incandescent bulbs), televisions, or on the other side of a wall from a major appliance like a refrigerator or entertainment center.
- Uninsulated Wall Cavities: This is a more subtle but common problem in older homes. If your thermostat is mounted on an exterior wall that is poorly insulated, the “phantom” cold or heat from the outside can radiate through the wall cavity and directly affect the back of the thermostat, skewing its readings.
The Solution: If your thermostat is in a bad location, the only true fix is to move it. If this isn’t feasible, the next best solution is to use a Nest Temperature Sensor.
Tier 2 Troubleshooting: The Influence of Remote Nest Temperature Sensors
A Nest Temperature Sensor is a small, wireless puck that you can place in another room. It allows the Nest Thermostat to know the temperature in the most important rooms, not just the hallway. This is a brilliant feature, but it can also be a source of confusion.
How Nest Temperature Sensors Work
In the Google Home app or Nest app, you can choose which sensor the thermostat should use as its primary reading. For example, you can tell your Nest to use the temperature from the sensor in the baby’s nursery to control the entire HVAC system.
The Diagnostic Step
If you have a sensor and your temperature seems wrong, open the app immediately. Check which sensor is currently active. If your main living area feels frigid, but the thermostat says it’s 78°F, you may discover that your system is currently running based on the sensor in your hot, sun-drenched upstairs office.
Creating a Sensor Schedule
The solution is to create a schedule. You can program the Nest to use the main thermostat’s sensor during the day, switch to the living room sensor in the evening, and then use the master bedroom sensor overnight, ensuring the right room is the right temperature at the right time.
Tier 3 Troubleshooting: Software and System Settings
If the location and sensors are correct, the issue may be a software glitch or a misunderstanding of how the system operates.
The Full Restart and Power Cycle
- Restart from the Menu: A simple restart can clear temporary glitches. On your thermostat, go to Settings > Reset > Restart.
- The Full Power Cycle: If a simple restart doesn’t work, perform a full power cycle. Go to your home’s circuit breaker panel and turn off the breaker that controls your HVAC system. Wait at least 60 seconds, then turn it back on. This will force a complete reboot of both your thermostat and your HVAC system’s control board.
Understanding the Maintenance Band (Temperature Differential)
Your HVAC system is not designed to turn on and off every single minute; this “short-cycling” would quickly destroy the equipment. To prevent this, all thermostats use a “maintenance band,” also called a temperature differential.
- How it Works: This is a small buffer around your target temperature, typically +/- 1°F (or 0.5°C). If you set your AC to 70°F, the system will not turn on the moment the room hits 70.1°F. It will wait until it drifts up to 71°F. Similarly, it will cool the room down to 69°F before shutting off. This behavior is normal and necessary to protect your HVAC system.
Tier 4 Troubleshooting: Diagnosing Hardware and HVAC Issues
If you have exhausted all the steps above and your temperature reading is still wildly inaccurate, you may have a hardware problem.
Is the Nest Thermostat Itself Faulty?
It’s rare, but the internal thermistor can fail.
- How to Test: Turn off the power to your HVAC system at the breaker. Gently pull the Nest display off its wall plate. Place it on a table in the center of the room, away from any drafts or heat sources, next to a separate, reliable thermometer that you trust. Let them both sit for 20-30 minutes to acclimate. If the temperature displayed on the Nest screen is still significantly different (more than 3-4 degrees) from your trusted thermometer, then the Nest’s internal sensor may be faulty, and you should contact Google Support.
Could It Be Your HVAC System?
If the Nest seems accurate when it’s off the wall, but your home is never comfortable, the problem is likely not the thermostat, but your HVAC system itself.
- Clogged Air Filter: A dirty, clogged air filter is the #1 cause of poor HVAC performance. It restricts airflow, leading to uneven temperatures and causing your system to work much harder than it needs to.
- Blocked Vents or Leaky Ducts: If the vents in the room with your thermostat are blocked or closed, or if there is a major leak in your ductwork, the room will not receive proper airflow, and the thermostat’s reading will not be representative of the rest of the house.
Frequently Asked Questions (FAQ) about Nest Temperature Accuracy
1. Why does the temperature on my Nest app sometimes not match the thermostat display? This is usually due to either rounding (the app and the display round the precise temperature differently) or a momentary sync delay between the device and the cloud service. This is normal and usually resolves itself within a minute.
2. How do I manually calibrate my Nest Thermostat? Unlike some older thermostats, the Nest does not have a user-facing temperature offset or calibration feature. Google’s philosophy is that if the reading is inaccurate, it’s due to an underlying environmental or system problem that should be fixed, rather than simply applying a digital “band-aid” with an offset.
3. Why does my Nest say “Delayed for 2:30” before turning on the AC? This is a built-in safety feature to protect your air conditioner’s compressor. The compressor should not be rapidly turned on and off. The Nest enforces a short delay to prevent this “short-cycling,” which can significantly extend the life of your expensive HVAC equipment.
4. How long does it really take for the Nest to “learn” my home and schedule? It typically takes about one to two weeks for the Nest Learning Thermostat to get a good sense of your schedule and start making automatic adjustments confidently. However, it is always learning the thermal properties of your home (how quickly it heats up and cools down) and will continue to refine its performance over time.
5. I have a multi-zone HVAC system. Can I use a Nest for that? Yes, but each zone requires its own separate Nest Thermostat. You cannot use a single thermostat with multiple remote sensors to control a true multi-zone system with separate duct dampers.
The Final Verdict: A Logical Path to an Accurate Reading
An inaccurate Nest Thermostat is a deeply frustrating problem, but it is very rarely caused by a faulty device. In almost all cases, the issue is environmental, a simple settings misunderstanding, or an underlying issue with the HVAC system itself.
Your troubleshooting process should always follow a logical funnel. First, confirm you are reading the display correctly (target vs. current temperature). Second, thoroughly investigate the thermostat’s physical location, as this is the number one cause of inaccurate readings. Third, check your remote sensor settings in the app. Fourth, work through software solutions like a restart or a reset. Only after you have confidently eliminated all of these possibilities should you suspect a hardware failure. By following this methodical process, you can move from frustration to a solution, ensuring your Nest Thermostat has the accurate data it needs to keep your home both comfortable and efficient.
Learn more about Smart Security
