A Deep Dive into How They Work, Strategic Placement, and Smart Home Automation
In the world of home security, high-tech cameras, loud sirens, and advanced AI often steal the spotlight. But the true, unsung hero of any effective alarm system is a small, simple, and remarkably reliable device: the door and window sensor. Often called a contact or entry sensor, this humble component is the digital tripwire that forms the backbone of your home’s perimeter defense. It is your first and most important line of defense against an intrusion.
Because of their simplicity, these critical devices are often misunderstood, improperly installed, or their full potential is left completely untapped. A security system with poorly placed sensors is a system with glaring holes in its armor.
This guide will serve as your definitive masterclass on this foundational security component. We will deconstruct the elegant science that makes these sensors work, explore the different types available for various applications, provide a professional-level playbook for strategic placement, and reveal the powerful and creative role these simple sensors can play in modern smart home automation, extending their purpose far beyond just security.
The Science of Simplicity: How Does a Magnetic Contact Sensor Work?
The genius of a door and window sensor lies in its almost foolproof simplicity. It has no complex electronics and requires almost no power to operate.
The Two Key Components
Every standard contact sensor consists of two parts:
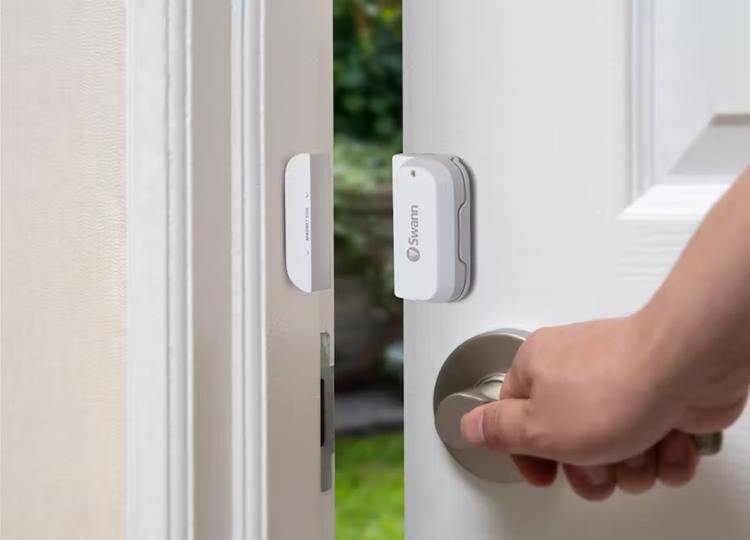
- The Reed Switch: The larger part of the sensor, which is mounted on the stationary frame of a door or window, contains a “reed switch.” This is a tiny, hermetically sealed glass tube containing two thin, metallic strips (the “reeds”) that are not quite touching.
- The Magnet: The smaller part of the sensor is simply a powerful, permanent magnet, which is mounted on the moving part of the door or window itself.
The Magic of Magnetism
The operation is beautifully simple:
- When the door is closed, the magnet is positioned next to the reed switch. The magnetic field from the magnet pulls the two metal reeds together, causing them to touch and complete a tiny electrical circuit. The sensor reports a “Closed” state to the alarm panel.
- When the door is opened, the magnet moves away from the reed switch. The magnetic force is removed, the reeds spring apart, and the circuit is broken. The sensor immediately reports an “Open” state, which triggers the alarm.
Why This is a Superior Technology
This simple, magnetic-based mechanism is what makes the contact sensor so incredibly effective. Because there are no complex moving parts or advanced electronics, it is exceptionally reliable, produces almost zero false alarms, and can operate for 5 to 10 years on a single, tiny battery.
A Buyer’s Guide: Deconstructing the Different Types of Contact Sensors
While they all work on the same principle, contact sensors come in several form factors for different applications.
- Surface-Mount Sensors: This is the most common type found in all DIY security systems. The two rectangular plastic housings are mounted directly to the surface of the door and frame using high-bond adhesive tape. They are incredibly easy to install.
- Recessed (or “Plunger”) Sensors: This is the type often used by professional installers for a clean, invisible look. The cylindrical sensor and magnet are drilled into and recessed within the door and the frame, making them completely hidden when the door is closed.
- Garage Door Tilt Sensors: A standard contact sensor can be tricky to install on a roll-up garage door. A tilt sensor is a better solution. It’s a single-piece device mounted on the top panel of the garage door. It uses an internal tilt switch or an accelerometer to detect the horizontal-to-vertical change in angle, providing a more reliable “open” or “closed” status for a garage door.
- Outdoor/Weatherproof Sensors: For securing gates, sheds, or barn doors, you need a sensor specifically designed for outdoor use. These features weatherproof, durable housings and often have a more powerful magnet and a wider gap tolerance.
The Pro’s Playbook: A Strategic Guide to Sensor Placement
Where you place your sensors is the most critical element of building a formidable perimeter defense.
The Golden Rule: Every Accessible Entry Point
This is the non-negotiable foundation of any alarm system. You must place a contact sensor on every single accessible exterior door and ground-floor window. This includes:
- The front door and back door.
- The door leading from your attached garage into your home (a very common entry point).
- All ground-floor windows, including small bathroom windows.
- Any sliding glass or patio doors.
Securing the Second Floor
You don’t typically need to sensor every upstairs window. However, you absolutely should place a sensor on any second-story window that is easily accessible from the outside, such as a window above a flat porch roof or one that can be reached from a large, climbable tree.
Beyond the Perimeter: Interior “Zoning” for Advanced Awareness
Contact sensors are not just for the exterior. They are a powerful tool for creating internal security “zones” and for getting discreet alerts.
- Sensitive Rooms: Place a sensor on the interior door to your home office, a closet containing a gun safe, a liquor cabinet, or a medicine cabinet. These can be set to trigger a silent alert to your phone instead of a full-blown alarm.
- The “Safe Room” Strategy: Placing a sensor on a master bedroom or closet door, which can be configured to chime when opened, provides an early warning if an intruder has breached your exterior perimeter and is now moving within the house.
The “How-To” of a Perfect Installation
- Mind the Gap: The sensor and magnet must be very close to each other when the door/window is closed. The maximum allowable gap is typically between a half-inch and one inch.
- Alignment is Key: Most sensors have small alignment marks or lines on their plastic casing. Ensure these marks are directly facing each other for a reliable connection.
- Dealing with Tricky Molding: Doors and windows often have complex, decorative molding that makes it difficult to mount the sensor and magnet on the same level. Use the included plastic spacers or a bit of wood to build up the surface under one of the components to ensure they are flush and aligned.
Beyond Burglary: The Contact Sensor as a Smart Home Catalyst
In a modern smart home, a contact sensor’s job has evolved. It is no longer just an alarm trigger; it is a source of crucial “state” information (open or closed) that can be used as a powerful trigger for a nearly limitless range of automations.
5 Powerful Smart Home Automations Using Contact Sensors
- “Welcome Home” Lighting: Create a routine: “If the front door sensor opens between sunset and sunrise, then turn on the entryway and living room lights to 70% brightness.”
- HVAC Energy Efficiency: This is a brilliant money-saving automation. Create a rule: “If the air conditioning is running, AND a window sensor has been in the ‘open’ state for more than 5 minutes, THEN shut off the HVAC system and send a notification to my phone.”
- The “Silent Alert”: Create a routine where if the sensor on your liquor cabinet, your “secret snack” drawer, or your home office door is opened, you get a discreet text message on your phone without sounding a loud alarm.
- “Did I Forget…?” Alerts: Use your phone’s location (geofencing) in an automation: “If my phone’s location is no longer ‘Home,’ AND the garage door tilt sensor is still in the ‘open’ state, THEN send a priority alert to my phone.”
- The Refrigerator Door Alarm: Place a contact sensor on your refrigerator or freezer door. Create a simple routine: “If the freezer door has been open for more than 2 minutes, then have my Alexa smart speaker announce, ‘The freezer door has been left open.'”
The Ultimate Troubleshooting Guide: What to Do When a Sensor Fails
- Symptom 1: The Sensor Shows “Open” When the Door is Closed.
- Cause 1: Misalignment. The door or window may have settled over time, causing the sensor and magnet to be too far apart. Check the gap and reposition one of the halves to be closer.
- Cause 2: Low Battery. As a sensor’s battery dies, it can sometimes get “stuck” in an open state. This is the most common cause.
- Symptom 2: The Sensor is “Offline” or “Not Responding.”
- Cause 1: Dead Battery. The battery has completely died and must be replaced.
- Cause 2: Out of Range. The sensor is too far from the central security hub. This can happen in very large homes or when trying to place a sensor in a detached shed.
- Cause 3: Signal Interference. A new, large metal object (like a refrigerator or filing cabinet) placed between the sensor and the hub can block the radio signal.
Frequently Asked Questions (FAQ) about Door and Window Sensors
1. How long do the batteries last in a wireless contact sensor? Due to their extremely low power consumption, the batteries in a high-quality contact sensor are designed to last a very long time, typically between 5 and 10 years.
2. Can an intruder use a powerful magnet to “trick” or defeat my sensor from the outside? This is a common theoretical concern but is practically impossible in the real world. An intruder would need an extremely powerful magnet, would have to know the exact location of the tiny reed switch inside the housing, and would have to hold it in the perfect position, all without being seen. It is not a viable, real-world method of entry.
3. What is the difference between a contact sensor and a glass break sensor? A contact sensor only triggers an alarm if the door or window is physically opened. A glass break sensor is an acoustic sensor that triggers an alarm if it hears the sound of the glass being smashed. For comprehensive protection, it is best to use both.
4. My window opens by tilting inward from the top. What kind of sensor should I use? For casement, awning, or tilt-and-turn windows, a standard contact sensor is still the best choice. You simply mount the sensor and magnet on the frame and the moving part of the window, ensuring that the connection is broken as soon as the window begins to open.
5. Can I use a standard indoor door sensor on an outdoor gate? No. You must use a sensor that is specifically rated for outdoor use. An outdoor sensor will have a weatherproof housing to protect it from rain and temperature extremes and will typically have a more powerful magnet and a wider gap tolerance to account for the movement of an outdoor gate.
The Final Verdict: The Indispensable Backbone of Your Security
In the exciting world of smart home security, while advanced cameras and AI-powered analytics get all the attention, the humble door and window sensor remains the most important, most reliable, and most cost-effective component of any alarm system. Its elegant simplicity is its greatest strength.
The strategy for its use is clear: cover every accessible entry point on your ground floor without exception. From there, you can expand its role from a simple security trigger to a powerful automation catalyst for a truly intelligent and responsive home. By strategically deploying a comprehensive network of these reliable, battery-powered sentinels, you are building the indispensable and unwavering foundation of a truly secure and smart home.
Learn more about Security Systems
